We've launched our new site at www.openlighting.org. This wiki will remain and be updated with more technical information.
Difference between revisions of "OLAGuruPlug"
From wiki.openlighting.org
| Line 1: | Line 1: | ||
| − | |||
__TOC__ | __TOC__ | ||
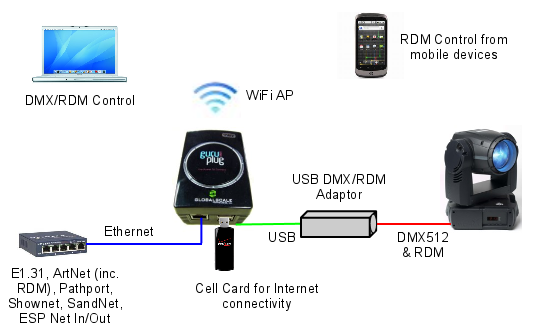
| + | [[Image:Guru-plug-setup.png|center]] | ||
This describes how to setup [[OLA]] installed on a [http://www.globalscaletechnologies.com/c-4-guruplugs.aspx GuruPlug]. These devices make excellent low cost [[DMX512]] nodes. For a list of compatible USB devices see the main [[OLA]] page. | This describes how to setup [[OLA]] installed on a [http://www.globalscaletechnologies.com/c-4-guruplugs.aspx GuruPlug]. These devices make excellent low cost [[DMX512]] nodes. For a list of compatible USB devices see the main [[OLA]] page. | ||
Revision as of 09:48, 22 May 2010
Contents
This describes how to setup OLA installed on a GuruPlug. These devices make excellent low cost DMX512 nodes. For a list of compatible USB devices see the main OLA page.
Features:
- 2 Gig Ethernet ports
- Wifi 802.11 b/g (not recommended for lighting control)
- 2 USB ports
- Cheap ($99US)
Prerequisites
This assumes you have a shell on the guru plug and that it can contact the internet to download the packages. Note that the default guru plug is insecure and comes with a lot of extras (samba, mysql, lighthttpd etc.) that aren't required. Fixing this is outside the scope of this tutorial.
Installation
Add the following line to /etc/apt/sources.list:
deb http://www.nomis52.net/data/ola-arm ./
Then apt-get install ola:
 $ apt-get update
 $ apt-get install olad
Setup
Add a user ola for the daemon to run as:
$ adduser ola
If you intend to use USB devices, you need to add this user to the plugdev & dialout groups. Modify the lines in /etc/group:
 dialout:x:20:ola
 plugdev:x:46:ola
Finally add any udev rules that you'll need. See OLA Device Specific Configuration
Running
Change to the ola user and the start the daemon:
 $ su ola
 $ olad -l 3
Now connect the the GuruPlug on port 9090 with your browser to configure it.
