We've launched our new site at www.openlighting.org. This wiki will remain and be updated with more technical information.
Difference between revisions of "Using the RDM Test UI"
From wiki.openlighting.org
| Line 1: | Line 1: | ||
This guide explains how to run the RDM Responder Tests using the Web UI, and also how to use the RDM Responder Publisher to list your products on the http://rdm.openlighting.org site. The screen shots in this guide may be slightly different to what you see as the software is constantly evolving. | This guide explains how to run the RDM Responder Tests using the Web UI, and also how to use the RDM Responder Publisher to list your products on the http://rdm.openlighting.org site. The screen shots in this guide may be slightly different to what you see as the software is constantly evolving. | ||
| − | |||
| − | |||
<div style="border: 1px solid #ff0000; background-color: #ffccff; padding: 3px"> | <div style="border: 1px solid #ff0000; background-color: #ffccff; padding: 3px"> | ||
<b>Warning</b>: The tests send SET messages to the broadcast UIDs. This means that they will change the start address, device label etc. of all devices connected to the controller. Think twice about running this on your production lighting rig. | <b>Warning</b>: The tests send SET messages to the broadcast UIDs. This means that they will change the start address, device label etc. of all devices connected to the controller. Think twice about running this on your production lighting rig. | ||
</div> | </div> | ||
| + | |||
| + | |||
| + | == RDM Responder Tests == | ||
=== Procedure === | === Procedure === | ||
| + | |||
| + | Open a browser and navigate to the device which is running the test server. This will either be your local machine (http://localhost:9099) or the Raspberry Pi (http://<ip>:9099, replace <ip> with the IP address of the Pi). You should be presented with a screen like the one below. | ||
| + | |||
| + | [[Image:Rdm-responder-tests-start.png|center|thumb]] | ||
| + | |||
| + | Select the universe to test from the drop down menu, followed by the RDM responder to test. If required you can run a RDM discovery on the universe by clicking the button with the magnifying glass. | ||
| + | |||
| + | ==== RDM Options ==== | ||
| + | |||
| + | ;Delay after broadcast SET | ||
| + | : After sending a broadcast SET, controller can immediately follow with another RDM command since no response is expected. This causes problems for some devices when they need to update persistent memory as part of handling the SET command. This option adds a delay between a broadcast SET and the next RDM command. Usual values are 20 - 100ms. | ||
| + | |||
| + | ==== DMX Options ==== | ||
| + | |||
| + | This option enables interleaving RDM frames with DMX frames. You can set the frame rate and the number of slots (channels) to send. | ||
| + | |||
| + | === Tests to Perform === | ||
| + | |||
| + | This allows you to select the tests to run. You can either add tests individually or select <tt>Add all</tt>. After running the one round of tests the list of failed tests will appear in the second box. | ||
| + | |||
| + | |||
| + | === Results Page === | ||
| + | |||
| + | After clicking the <tt>Run Tests</tt> | ||
| + | |||
Revision as of 19:11, 10 November 2012
This guide explains how to run the RDM Responder Tests using the Web UI, and also how to use the RDM Responder Publisher to list your products on the http://rdm.openlighting.org site. The screen shots in this guide may be slightly different to what you see as the software is constantly evolving.
Warning: The tests send SET messages to the broadcast UIDs. This means that they will change the start address, device label etc. of all devices connected to the controller. Think twice about running this on your production lighting rig.
Contents
RDM Responder Tests
Procedure
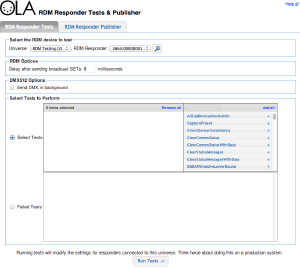
Open a browser and navigate to the device which is running the test server. This will either be your local machine (http://localhost:9099) or the Raspberry Pi (http://<ip>:9099, replace <ip> with the IP address of the Pi). You should be presented with a screen like the one below.
Select the universe to test from the drop down menu, followed by the RDM responder to test. If required you can run a RDM discovery on the universe by clicking the button with the magnifying glass.
RDM Options
- Delay after broadcast SET
- After sending a broadcast SET, controller can immediately follow with another RDM command since no response is expected. This causes problems for some devices when they need to update persistent memory as part of handling the SET command. This option adds a delay between a broadcast SET and the next RDM command. Usual values are 20 - 100ms.
DMX Options
This option enables interleaving RDM frames with DMX frames. You can set the frame rate and the number of slots (channels) to send.
Tests to Perform
This allows you to select the tests to run. You can either add tests individually or select Add all. After running the one round of tests the list of failed tests will appear in the second box.
Results Page
After clicking the Run Tests
Saving the Logs
The logs can be saved for offline analysis.
RDM Responder Publisher
The RDM Responder Publisher can be used to collect information about a device (using RDM) and then publish that information to the http://rdm.openlighting.org site. This allows manufacturers to quickly list their responders on the site.
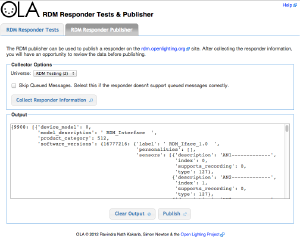
The following information is collected:
- Device Model ID
- Manufacturer ID
- Product Category
- Personalities (label, index & DMX slot count)
- Sensors
- Software Version Label
- Supported Parameters (IDs only)
Procedure
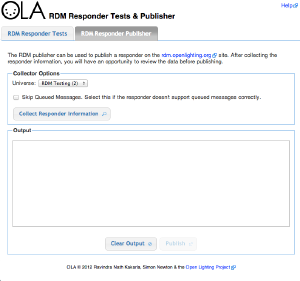
Under the 'RDM Responder Publisher' tab, select the universe to use and click Collect Responder Information.
The data collected will be shown in the Output frame. If you experience problems trying to collect the data, retry the tests with the Skip Queued Messages option selected.
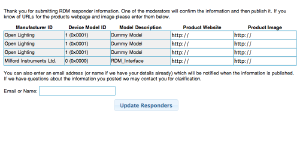
If you are happy with the data, click on the Publish button and the data will be uploaded to the rdm.openlighting.org servers. At this point you can add links to the product's website and an image for the product. You can also add an email address if you would like to be notified when the information is posted on the site.
One of the site moderators will check the information for accuracy. This usually takes a few days after which the products will be visible on the site.
Reporting Bugs
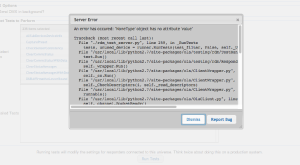
If an error occurs while running the tests or collecting RDM responder information a dialog box will be displayed. Clicking on the 'Report Bug' button will open a new window and allow you to submit a bug report. The bug tracking system is hosted on Google Code, so you'll need to sign in with a Google account.
All other bugs can be reported at http://code.google.com/p/open-lighting/issues/entry
